Friday, January 30, 2009
Nothing new
It has been awhile since I posted anything and really there is nothing much to write... I did take the Jeep up hunting in October and fought problems the entire time I was up there. (Oh and I didn't see any game so I came home skunked this year.) Come to find out I have vacuum leaks around the base of the carb and around the intake and heads causing me issues so the Jeep is just going to sit in the driveway until the weather gets warmer. Oh and I won't be registering it until I can get it running again.
Monday, September 22, 2008
HEI Distributor Install
This was actually installed last April with help from my cousin-in-law Matt. Thanks Matt.

Since the Buick V6 that is in the Jeep originally came with a points distributor, which is older technology and requires much more maintenance and is inferior to an electronic High Energy Ignition (HEI), and the fact that I failed my emissions test, I decided to upgrade to the HEI distributor. I found a good deal in an online classified, so $60 later I had a used distributor and new 8mm plug wires shipped to my door.
Not to get too detailed on the install, but we had to make a few modifications to get the distributor to work. Since the HEI takes up more room I had to grind some meat off the front of the intake manifold, replace an intake bolt with a button head bolt to gain even more room, and grind off some meat on the distributor cap to get it to work. I also had problems with getting the HEI to fire on more than 3 cylinders. It took us hours before we found that the distributor cap was 90 degrees off of where it should be on the distributor
housing. Once we made the modifications to rotate the cap to the correct alignment she fired right up and was firing on all 6 cylinders. After a few minutes of adjusting the timing the engine was running better than it ever has. The engine no longer missed and it seemed to have more power than ever.
I don't have a before picture of the distributor, but here is the after pic of the HEI install:
Monday, September 15, 2008
New Seats!
I replaced the old crappy green seats that were out of a Pontiac with some cheap plastic racing seats I bought from a yard sale. I used the original seat mounts which were also used for the Pontiac seats, cut and drilled some angle iron to mount to the new seats, and welded the angle iron to the original mounts.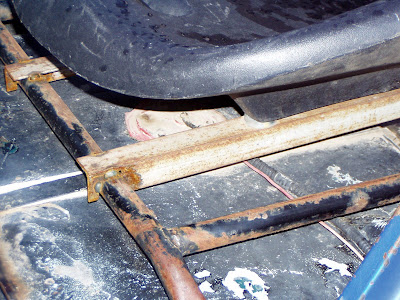 Here are some before and after shots of the seats:
 Huge improvement, I bet I removed 50+ pounds in weight, and they are pretty comfortable.
 Here are some before and after shots of the seats:
 Huge improvement, I bet I removed 50+ pounds in weight, and they are pretty comfortable.
Saturday, July 12, 2008
Parking Brake
Last night I was able to finish up installing the hand brake I bought from an earlycj5.com member. Since there was no parking brake for it when my dad bought the Jeep, he and my brother installed a foot operated one from a late model CJ5. The problem was it did not have the throw needed to be of much use and would barely engage the parking brake. It was also close to the clutch pedal so you had to be careful when engaging the clutch. Here is a picture of the parking brake after I removed it from the Jeep (I forgot to take one before I removed it):
 Since the original hand brake was torn out long ago I had to fabricate up a mount for the cable to attach to the transfer case cross brace. I used a piece of angle iron that I cut with my new reciprocating saw and drilled two holes, one to mount the brake cable and the other to bolt it down to the cross member. Here is what I came up with:
 I figured out where to mount the hand brake in the cab:
 And hooked up the cable to the parking brake:
 If you have never seen a parking brake on an early CJ5 it is a cool design, the brake is attached to the output shaft of the transfer case which will lock up the drive train to the rear wheels. There is a major design problem with putting a brake there, the transfer case is prone to leaking, and yep, you guessed it, will lube up the parking brake rendering it pretty useless. Here is a picture of the drum parking brake:
 The hand brake has plenty of throw to engage the parking brake now, so it may be a little more useful on the trail.
Wednesday, July 9, 2008
Emmissions test
You are probably asking yourself: Why would a 1965 vehicle even need to be tested, especially since there were no emission equipment installed or even required in '65? Well I guess some politicians back in 1984 decided vehicle emission testing was a good idea (which it is) and they had to pick a cut-off year for exemptions so in their wisdom they used a nice round number like, oh, 20 years. I guess nobody had a brother or cousin working as an auto mechanic to point out the fact that emission equipment wasn't added to vehicles until the 70's. So if my Jeep would have been titled one year earlier it would be exempt from emission testing in Ada County.
Ok, now that I got that off my chest, I do feel better by the way, I can get to the test results. My first try at passing the emissions test was early April of 2008, the Jeep failed miserably in all but the 2500 RPM CO%. You can see here that my HC (Hydrocarbons) were off the chart, which basically means that unburned fuel was being expelled from the engine and out the exhaust. Which was very evident since you could tell the engine was missing when it ran. The image below shows the Standard column as the highest amount of gasses you can expell and still pass as you can see by the Test column I didn't do so well:

So, I had to figure out why the engine wasn't burning fuel. It was either the carb or the ignition that was causing the problem so I went about working on both. I ended up rebuilding the carb and upgrading the points distributor to an electronic distributor. (which will both be covered in a blog post when I get around to writing them) I also changed the air filter, oil filter and oil, got the engine good and hot right before my second test (which I took just a few days prior to my registration being revoked) and crossed my fingers hoping for the best. Here are the results of my second test:
 BOOYAH! It passed with plenty of room to spare. So now that it will be legal to drive on the streets I should get to work installing the seat belts and a parking brake.
Monday, June 9, 2008
Weldernator... True power!
Just for giggles (and because I was on a welding kick for quite awhile) I decided building a weldernator would be a fun project. I had no idea how to put one together and I didn't want to pay $800 for a kit that I knew I could build for much less. I decided on a plan after doing some research using these sites:
This was actually an easy afternoon project, most of my time was spent figuring out how to build a mount for the weldernator. The rest of the modifications went pretty fast. It was a little intimidating at first since I have never opened an alternator before... The feeling faded fast once I realized how simple an alternator really was. For the Delco alternator you just have to bypass the voltage regulator and remove the exciter diode shown in this drawing from the second write-up I listed above: I used this diagram for the wiring from the same write-up, but did not add the resistors shown:
 The hardest part and most time consuming was planning the placement and fabbing up the weldernator mount. I ended up using some scrap flat bar I had laying around for the mount, bolted the rear pivot support to the engine block and welded the front pivot to the alternator adjusting arm. After a coat of black Rustoleum I bolted it on so now the weldernator will mount right above the existing alternator:
 I created a weldernator adjusting arm from old bed frame angle iron which just hooks to the passenger side radiator/grill support bar (that runs back and attaches to the firewall). It is not a permanent setup, I only throw the weldernator on when I need it, otherwise the torsional movement of the engine when wheeling would bend the radiator/grill support rod. It only takes 5 minutes to throw on the jeep when I need to weld with it:
 The transition from alternator to weldernator modifications were actually the easiest part and took me about an hour to complete. I didn't get any pictures of the inside of the alternator while I had it opened, but you can find them in the above links. I changed out a bolt, added a chunk of plastic to help insulate the positive terminal from the alternator case, and added some quick connects for the welding cables:
 I added a switch and an inline 20 amp fuse to power the exciter field of the weldernator seen in the top left portion of the following image. I also attached an electrical outlet to run a drill or grinder:
 I rigged up a hand throttle from bike parts, use my dwell meter to dial in the RPM I want, and use a cheap hand held multimeter to check the voltage output:
 I bought a new ground clamp, two ~15 foot #2 welding cables, (odd lengths left at the end of the spool at the LWS) and welding quick connects, but used an old stinger I had laying around:
 Here is an image of it mounted above the alternator, that angle makes it look like the belts are touching, they really aren't:
 I was very surprised at how well I could weld with the weldernator, not that I am a good weldor, but I actually weld better with it then I can with dad's old Miller Thunderbolt. Of course the high frequency DC from the weldernator has some advantages over the AC only Thunderbolt.
Creating a welder out of an alternator was the most enjoyable jeep project I have completed to date. I definitely suggest to anyone thinking about installing an onboard welder to research a DIY setup such as this or the others listed above before you decide to buy a kit. It would be well worth your time no matter what you decide. It was well worth it in my case, for $100 I can say I built an onboard welder that works just as well as the $800 kits, and the $700 I saved will buy a lot of scrap metal and parts for the Jeep and a lot of beer for me.
Now I just need to find some welding projects for my mobile weldernator... :)
- http://www.geocities.com/Yosemite/2472/obweld.html
- http://www.huv.com/jon/jeep/Welder/on-board-welder.html
- http://home.comcast.net/~t.molnar/Obwelder1.htm
- http://www.madelectrical.com/electri...elcoremy.shtml
This was actually an easy afternoon project, most of my time was spent figuring out how to build a mount for the weldernator. The rest of the modifications went pretty fast. It was a little intimidating at first since I have never opened an alternator before... The feeling faded fast once I realized how simple an alternator really was. For the Delco alternator you just have to bypass the voltage regulator and remove the exciter diode shown in this drawing from the second write-up I listed above:
 I used this diagram for the wiring from the same write-up, but did not add the resistors shown:
 The hardest part and most time consuming was planning the placement and fabbing up the weldernator mount. I ended up using some scrap flat bar I had laying around for the mount, bolted the rear pivot support to the engine block and welded the front pivot to the alternator adjusting arm. After a coat of black Rustoleum I bolted it on so now the weldernator will mount right above the existing alternator:
 I created a weldernator adjusting arm from old bed frame angle iron which just hooks to the passenger side radiator/grill support bar (that runs back and attaches to the firewall). It is not a permanent setup, I only throw the weldernator on when I need it, otherwise the torsional movement of the engine when wheeling would bend the radiator/grill support rod. It only takes 5 minutes to throw on the jeep when I need to weld with it:
 The transition from alternator to weldernator modifications were actually the easiest part and took me about an hour to complete. I didn't get any pictures of the inside of the alternator while I had it opened, but you can find them in the above links. I changed out a bolt, added a chunk of plastic to help insulate the positive terminal from the alternator case, and added some quick connects for the welding cables:
 I added a switch and an inline 20 amp fuse to power the exciter field of the weldernator seen in the top left portion of the following image. I also attached an electrical outlet to run a drill or grinder:
 I rigged up a hand throttle from bike parts, use my dwell meter to dial in the RPM I want, and use a cheap hand held multimeter to check the voltage output:
 I bought a new ground clamp, two ~15 foot #2 welding cables, (odd lengths left at the end of the spool at the LWS) and welding quick connects, but used an old stinger I had laying around:
 Here is an image of it mounted above the alternator, that angle makes it look like the belts are touching, they really aren't:
 I was very surprised at how well I could weld with the weldernator, not that I am a good weldor, but I actually weld better with it then I can with dad's old Miller Thunderbolt. Of course the high frequency DC from the weldernator has some advantages over the AC only Thunderbolt.
Creating a welder out of an alternator was the most enjoyable jeep project I have completed to date. I definitely suggest to anyone thinking about installing an onboard welder to research a DIY setup such as this or the others listed above before you decide to buy a kit. It would be well worth your time no matter what you decide. It was well worth it in my case, for $100 I can say I built an onboard welder that works just as well as the $800 kits, and the $700 I saved will buy a lot of scrap metal and parts for the Jeep and a lot of beer for me.
Now I just need to find some welding projects for my mobile weldernator... :)
Thursday, May 29, 2008
Clutch linkage woes
Since I haven't posted on this blog in over a year I figured it would be a good time to catch everyone up on what I have done to the jeep in that time. The very first modification I did to the CJ5 was fix the clutch linkage, I actually fixed it before my first post, but I figured I should at least write about it and post a couple of pictures...
The clutch on the Jeep never did feel very smooth, in fact it took a lot of force to engage the clutch. Once I got under the Jeep I realized that someone at some point made some modifications, probably when they installed hanging brake and clutch pedals, which didn't look very trustworthy and contributed to the clutch binding problem. You can see some of the modifications in this pic (ewwww):

So after a little research and using some of the great minds over at the earlyCJ5.com forums, I decided to convert the clutch to a chain linkage. There are some after market ones out there but I decided to save some money and make one of my own. I had the scrap metal and bolts laying around the garage for this project but had to buy the size 40 chain and the sprocket from a local sprocket and bearing shop. I opted for a cheap sprocket which did not come with bearings, instead I pressed in a piece of copper pipe as a bushing which has worked great. I think when all said and done I only spent $40 on the parts and I am really happy with the result, it definitely takes much less effort now to engage the clutch. Here is a pic of the new and improved clutch chain linkage:

Subscribe to:
Posts (Atom)